目的:
-
在這個例子希望結合範例 69 和 71建構一個 MDI 程式, 它有兩種不同的顯示資料方式, 一種是運用 FormView 來做固定欄位的顯示,
另外一種則希望是用 Hex 的方式來顯示檔案的完整內容
- 程式新開啟的時候會顯示 FormView / HexView 兩種不同型態的選單讓使用者挑選
- 如果使用者選擇 HexView, 他可以使用 視窗/開啟 FormView 視窗 選單來開啟另一個 FormView 顯示同一份文件
- 如果使用者選擇 FormView, 他可以使用 視窗/開啟 HexView 視窗 選單來開啟另一個 HexView 顯示同一份文件
- 只有在 FormView 視窗中可以修改文件的內容, HexView 視窗中只能看到檔案的十六進位內容
- 如果在 FormView 中修改資料, 在 HexView 中必須立刻看到修改的結果
- 請替你的 document 物件加上存檔以及讀檔的功能
- 開啟舊檔案時以檔案的副檔名 .hex 或是 .frm 來決定使用 HexView 或是 FormView, 其他的副檔名都使用 HexView 來顯示
- 請替你的 HexView 視窗撰寫列印的程式碼, 列印十六進位的資料 (範例 71 中已經有部份的列印程式, 只是沒有適當地結合起來, 同時它使用 MM_TEXT 模式而不是 MM_LOENGLISH)
- 請替 FormView 中的控制項加入 tooltip 功能
由於程式操作者可以在 FormView 中修改文件的內容, 當內容修改後我們還是希望能夠在 Hex 的視窗內看到修改過的內容, 所以我們希望同一個檔案對應到程式裡單一的 CDocument 物件
我們要求的功能如下
額外功能
- FormView 並不支援列印, 但是如果你先完成 HexView (繼承 CScrollView), 如此你的界面還是可以列印,你可以在 FormView 中處理和 ID_FILE_PRINT, ID_FILE_PRINT_DIRECT, 和 ID_FILE_PRINT_PRIEVIEW 的訊息, 同時定義 OnPreparePrinting, OnBeginPrinting 和 OnEndPrinting, 如此新增的 FormView 還是有列印的界面, 你也許可以列印文字格式的檔案資料
- 其他...
基本設計:
這個應用程式基本上需要使用多個 document template, 根據上述的功能要求,我們需要有兩個不同的 view 對應到一個 document, 這個 document 裡資料由於要提供兩個不同種類的 view 來讀取, 由於其中 HexView 需要的資料是原始的檔案資料, 所以當 document 物件由檔案系統裡將資料讀入時不能像範例 69 中直接讀進 document 裡的成員變數, 必須維持檔案裡位元串流的格式, 我們可以把資料讀入一個 CMemFile 中暫存, 當 FormView 需要由 document 物件中取得資料時, 直接由已開啟的 CMemFile 中透過界面函式讀出資料, 並且透過 DDX 機制顯示在表格中, 當 FormView 中有資料被修改, 立刻透過 界面函式修改 CMemFile 裡的資料, 將 document 設為 modified, document 物件寫入檔案時就將 CMemFile 裡的資料儲存到檔案中。
在範例 71 中 HexView 使用 MM_TEXT 模式, 這種模式在必須加上特別的程式碼來製作列印功能, 我們希望使用 MM_LOENGLISH 模式來撰寫, 不過要特別注意 y 座標軸變成是向上的。
步驟一:
我們先模仿範例 71 HexView 應用程式製作一個 HexView 的程式, 但是需要加上設定顯示字型、列印、以及設定列印字型的功能
由於我們使用 MM_LOENGLISH 模式來撰寫, 顯示在螢幕上和列印時使用的字型是相同的
以 IDE 製作具有 CScrollView 的 MDI 應用程式
(此項暫時跳過, 在步驟三中再行設計) 在 view 的 OnInitialUpdate() 函式 以及 OnUpdate() 函式中由 document 物件讀取檔案的位元組數, 計算整個文件在邏輯座標系統中的大小, 讀取視窗的大小, 轉換為邏輯座標系統中的大小, 計算目前字型的高度及寬度, 轉換為邏輯座標系統中的大小, 最後呼叫 SetScrollSize() 設定 ScrollBar 的參數
在選單中加入一個 "檢視/設定顯示字型" 的功能選項 ID_VIEWFONT
在 view 類別中處理此選單命令, 加入下列程式, 以開啟字型選取對話盒
	LOGFONT lfCopy;
	memcpy(&lfCopy, &m_logfont, sizeof(lfCopy));

	// pop up the common font dialog for user to choose
	CFontDialog dlg(&lfCopy);
	dlg.m_cf.Flags |= CF_FORCEFONTEXIST | CF_FIXEDPITCHONLY;

	// create the font and save it in a member variable for later use
	if (dlg.DoModal() == IDOK)
	{
		CFont*  pFontCopy = new CFont;
		if (pFontCopy->CreateFontIndirect(&lfCopy))
		{
			m_nPointSize = dlg.GetSize();
			if (m_pFont != NULL)
				delete m_pFont;

			m_pFont = pFontCopy;
			memcpy(&m_logfont, &lfCopy, sizeof(lfCopy));
			Invalidate();
		}
		else
		{
			delete pFontCopy;
			MessageBox(_T("Could not create new font!"));
		}
	}
這一段程式需要三個配合的成員變數, 在 view 類別中加入
1. LOGFONT m_logfont;
2. CFont *m_pFont;
3. int m_nPointSize;並且在建構元函式中以下列程式中適當地初始化
	memset(&m_logfont, 0, sizeof(m_logfont));
	m_nPointSize = 120;
	_tcscpy(m_logfont.lfFaceName, "Fixedsys"));

	// start out with a system font

	CWindowDC dc(NULL);
	m_logfont.lfHeight = ::MulDiv(m_nPointSize, dc.GetDeviceCaps(LOGPIXELSY), 720);
	m_logfont.lfPitchAndFamily = FIXED_PITCH;

	m_pFont = new CFont;
	m_pFont->CreateFontIndirect(&m_logfont);
並在解構元函式中刪除 m_pFont 物件
編譯並執行
步驟二:
在 View 類別中加入下列函式計算字型實際顯示時的高度
int CMyView::MeasureFontHeight(CFont* pFont, CDC* pDC)
{
	CFont* pOldFont;
	pOldFont = pDC->SelectObject(pFont);

	CRect rectDummy;
	CString strRender = _T("1234567890ABCDEF- ");
	int nHeight = pDC->DrawText(strRender, -1, rectDummy,
								DT_TOP | DT_SINGLELINE | DT_CALCRECT);
	pDC->SelectObject(pOldFont);

	return nHeight;
}

使用這種方式量測到的是真正顯示在螢幕上的高度, 在預覽列印功能裡當縮小顯示時,
有時因為找不到小的字型, 會用較大的字型來取代, 計算時需要很小心, 有些地方我會直接
由 font 物件中讀取其高度 lfHeight
步驟三:
在 OnDraw() 中加入顯示十六進位的程式碼
首先 document 類別中存放原始檔案資料,所以應該設計一個成員函式 GetDocLength() 可以取得 document 的大小 (單位為 byte)
OnPrepareDC(): 先不考慮列印的功能, 只設定 mapping mode
pDC->SetMapMode(MM_LOENGLISH);
只要 document 物件內容有所修改, scrollview 的參數就需要有變化, 所以我們在 view 的 OnInitialUpdate() 函式以及 OnUpdate() 函式中由 document 物件讀取檔案的位元組數, 計算整個文件在邏輯座標系統中的大小, 讀取視窗的大小, 轉換為邏輯座標系統中的大小, 計算目前字型的高度及寬度, 轉換為邏輯座標系統中的大小, 最後呼叫 SetScrollSize() 設定 ScrollBar 中控制項
    CClientDC dc(this);
    dc.SetMapMode(MM_LOENGLISH);
    CFont *pOldFont = dc.SelectObject(m_pFont);

    char str[] = "01035620 - 61 62 63 64 65 66 67 68-69 6a 6b 6c 6d 6e 6f 70  abcdefghijklmnop ";
    CSize lineSize;
    ::GetTextExtentPoint32(dc.GetSafeHdc(), str, (int)strlen(str), &lineSize);
    dc.SelectObject(pOldFont);

    int docLength = GetDocument()->GetDocLength();
    if (docLength == 0) docLength = 16;

    CSize sizeTotal(lineSize.cx, ((docLength-1)/16+1)*lineSize.cy);
    CSize sizeLine(lineSize.cx/((int)strlen(str)), lineSize.cy);

    CRect   rectClient;
    GetClientRect(&rectClient);
    dc.DPtoLP(&rectClient);
    CSize sizePage(rectClient.Width(), -rectClient.Height());

    SetScrollSizes(MM_LOENGLISH, sizeTotal, sizePage, sizeLine);
步驟四:
接下來就是顯示十六進位的繪圖程式碼了, 先不管列印部份的程式, 最主要就是計算出視窗對應到文件裡的哪一個區塊 viewRect 以及起始的列數 nStartLine, 然後由 document 物件中一列一列地把資料讀出來繪出
   CTwoViewDoc* pDoc = GetDocument();
   ASSERT_VALID(pDoc);
   CRect   viewRect;
   int     nStartLine;
   int     nHeight;
   CFont *pOldFont = (CFont*) pDC->SelectObject(m_pFont);


   if (m_bPrinting)
   {
       viewRect = CRect(1, -1, // .01 inch additional margin
                        m_nPageWidth - 1,
                        -m_nPageHeight + 1);
       nStartLine = m_nPrintLine;

       LOGFONT lf;
       m_pFont->GetLogFont(&lf);
       nHeight = lf.lfHeight;
   }
   else
   {
       CRect   rectClient;
       GetClientRect(&rectClient);
       pDC->DPtoLP(&rectClient);

    // 計算一行的高度與顯示字串的寬度 (單位是 logical unit, i.e. 0.01 in)

       char str[] = "01035620 - 61 62 63 64 65 66 67 68-69 6a 6b 6c 6d 6e 6f 70  abcdefghijklmnop ";
       CSize lineSize;
       ::GetTextExtentPoint32(pDC->GetSafeHdc(), str, (int)strlen(str), &lineSize);

       nHeight = -lineSize.cy;

    // 取得目前視窗左上角的邏輯座標 (整個文件的左上角設為 0,0)

       CPoint   scrollPos = GetScrollPosition();
       nStartLine = scrollPos.y / nHeight;

       viewRect = CRect(0,
                        nStartLine*nHeight,
                        lineSize.cx,
                        scrollPos.y + rectClient.Height());
    }

    CString strRender;
    strRender = "01035620 - 61 62 63 64 65 66 67 68-69 6a 6b 6c 6d 6e 6f 70  abcdefghijklmnop ";

//    TRACE("nHeight=%d m_nPageHeight=%d\n", nHeight, m_nPageHeight);

   if (pDoc->m_pFile != NULL)
   {
       int nLine;

       int docLength = pDoc->GetDocLength();

       for (nLine = nStartLine; (viewRect.top >= viewRect.bottom);
            nLine++)
       {
           if (!pDoc->ReadLine(strRender, 16, nLine*16))
               break;

           pDC->TextOut(viewRect.left, viewRect.top, strRender);
           viewRect.top += nHeight;
       }
   }

   pDC->SelectObject(pOldFont);
步驟五:
列印的部份我們在三個地方處理
- CHexView::OnPrepareDC
- CHexView::OnBeginPrinting
- CHexView::OnDraw (上一步驟中已經看到程式碼)
OnPrepareDC 中一是要判別此次的 DC 是螢幕繪圖還是印表機列印, 並且記錄在一個成員變數 m_bPrinting 中, 以便 OnDraw 中可以因應, 另外則是計算由哪一列開始列印 m_nPrintLine, 其程式碼如下
   if (pInfo == NULL)
       m_bPrinting = FALSE;
   else
   {
       int nHeight;
//     nHeight = -MeasureFontHeight(m_pFont, pDC);
       LOGFONT lf;
       m_pFont->GetLogFont(&lf);
       nHeight = -lf.lfHeight;
       m_nPrintLine = ::MulDiv(pInfo->m_nCurPage-1, m_nPageHeight, nHeight);
       m_bPrinting = TRUE;
   }
OnBeginPrinting 最主要是計算總共要列印多少頁, 利用 pInfo->SetMinPage() 及 pInfo->SetMaxPage() 設定, 其主要程式碼如下
   pDC->SetMapMode(MM_LOENGLISH);

   // in the unit of printer dot (e.g. 600dpi, 1/600 inch)
   CSize rawSize=CSize(pDC->GetDeviceCaps(PHYSICALWIDTH) - 2*(pDC->GetDeviceCaps(PHYSICALOFFSETX)),
                       pDC->GetDeviceCaps(PHYSICALHEIGHT) - 2*(pDC->GetDeviceCaps(PHYSICALOFFSETY)));
   pDC->DPtoLP(&rawSize);
   m_nPageWidth = rawSize.cx; // in logical unit (1/100 inch)
   m_nPageHeight = rawSize.cy;

   int nHeight = -MeasureFontHeight(m_pFont, pDC); // logical unit
   int nDocLength = pDoc->GetDocLength();
   int nPages = (nDocLength/16*nHeight + (m_nPageHeight-1)) / m_nPageHeight;

   pInfo->SetMinPage(1);
   pInfo->SetMaxPage(nPages);
CHexView 中所有用到的成員變數如下
   LOGFONT m_logfont;
   CFont *m_pFont;
   int m_nPointSize;
   BOOL m_bPrinting;
   int m_nPrintLine;
   int m_nPageWidth;
   int m_nPageHeight;
步驟六:
由於 document 物件內 ReadLine 功能還沒有寫,你沒有辦法測試上述程式,可以先在 document 物件裡加上一個 ReadLine 的函式, 傳回固定的一個 CString 來測試, 例如
    CString strRender = "01035620 - 61 62 63 64 65 66 67 68-69 "
                        "6a 6b 6c 6d 6e 6f 70 abcdefghijklmnop ";
    return strRender;
編譯並且測試, 你應該有一個正常顯示的 HexView,
由於離完成整個程式還有一段時間, 同時你已經作了不少程式碼了, 這個時候你應該要離開 visual studio, 把程式碼用 WINRAR 包裝起來
步驟七:
撰寫 document 物件中的 ReadLine
   BOOL CTwoViewDoc::ReadLine(CString& strLine, int nLength, LONG lOffset)
   {
       LONG lPosition;

       if (lOffset != -1L)
           lPosition = (long)m_pMemFile->Seek(lOffset, CFile::begin);
       else
           lPosition = (long)m_pMemFile->GetPosition();//取得檔案位置

       if (lPosition == -1L)
       {
           TRACE2("CTwoViewDoc::ReadLine returns FALSE Seek(%8.81X, %8.81X)\n",
                   lOffset, lPosition);
           return FALSE;
       }

       BYTE* pszBuffer = new BYTE[nLength];
       int nReturned = m_pMemFile->Read(pszBuffer, nLength);//讀入檔案

       if (nReturned <= 0)
       {
           TRACE2("CTwoViewDoc::ReadLine returns FALSE Read(%d, %d)\n",
                  nLength, nReturned);
           delete pszBuffer;
           return FALSE;
       }

       CString strTemp;
       CString strCharsIn;

       strTemp.Format(_T("%8.8lX - "), lPosition);
       strLine = strTemp;
       //進制的轉換
       for (int nIndex = 0; nIndex < nReturned; nIndex++)
       {
           if (nIndex == 0)
               strTemp.Format(_T("%2.2X"), pszBuffer[nIndex]);
           else if (nIndex % 16 == 0)
               strTemp.Format(_T("=%2.2X"), pszBuffer[nIndex]);
           else if (nIndex % 8 == 0)
               strTemp.Format(_T("-%2.2X"), pszBuffer[nIndex]);
           else
               strTemp.Format(_T(" %2.2X"), pszBuffer[nIndex]);

           if (_istprint, (pszBuffer[nIndex]))
               strCharsIn += pszBuffer[nIndex];
           else
               strCharsIn += _T('.');
           strLine += strTemp;
       }
       if (nReturned < nLength)
       {
           CString strPadding(_T(' '), 3*(nLength-nReturned));
           strLine += strPadding;
       }
       strLine += _T("  ");
       strLine += strCharsIn;

       delete pszBuffer;
       return TRUE;
   }
這個函式基本上是和範例 71 中的讀檔程式相同, 唯一更改的是由一個 CMemFile 物件 m_pMemFile 中讀取資料
步驟八:
在 OpenDocument 時開啟檔案並且開啟 CMemFile, 將檔案資料讀入 CMemFile 中暫存
BOOL CTwoViewDoc::OnOpenDocument(LPCTSTR lpszPathName)
{
    if (!CDocument::OnOpenDocument(lpszPathName))
        return FALSE;

    //檔案不是空時的處理
    if (m_pFile != NULL)
    {
        m_pFile->Close();
        delete m_pFile;
        m_pFile = NULL;
    }
    if (m_pMemFile != NULL)
    {
        delete m_pMemFile;
        m_pMemFile = NULL;
    }

    try
    {   //分配空間
        m_pFile = new CFile(lpszPathName, CFile::modeReadWrite | CFile::typeBinary);
    }
    //檔案異常時的處理
    catch (CFileException* e)
    {
        CString strError;
        strError.Format(_T("Couldn't open file: %d"),
            _sys_errlist[e->m_lOsError]);
        AfxMessageBox(strError);
        return FALSE;
    }
    //取得檔案長度
    m_lFileSize = (long) m_pFile->GetLength();

   m_pMemFile = new CMemFile;
   char buf[100];
   int nbytes;

   nbytes = m_pFile->Read(buf, 100);
   while (nbytes > 0)
   {
       m_pMemFile->Write(buf, nbytes);
       nbytes = m_pFile->Read(buf, 100);
   }

   return TRUE;
}
另外 GetDocLength() 如下
int CTwoViewDoc::GetDocLength(void)
{
    return m_lFileSize;
}
存檔的基本邏輯如下
BOOL CTwoViewDoc::OnSaveDocument(LPCTSTR lpszPathName)
{
    if (m_pMemFile)
    {
        if (m_pFile == 0)
            return FALSE; // illegal situation
        if (m_pFile->GetFilePath() != lpszPathName)
        {
            m_pFile->Close();
            delete m_pFile;
            m_pFile = new CFile(lpszPathName, CFile::modeCreate |
                                              CFile::modeReadWrite |
                                              CFile::typeBinary);
            // m_strPathName
        }
        m_pFile->Seek(0L, CFile::begin);

        char buf[100];
        int nbytes;

        m_pMemFile->Seek(0L, CFile::begin);
        nbytes = m_pMemFile->Read(buf, 100);
        while (nbytes > 0)
        {
            m_pFile->Write(buf, nbytes);
            nbytes = m_pMemFile->Read(buf, 100);
        }
        SetModifiedFlag(FALSE);
        return TRUE;
    }
    else
        return FALSE;

//  return CDocument::OnSaveDocument(lpszPathName);
}


編譯, 執行, 偵錯, 測試後包裝為 winrar 的 package, 以免將來做錯什麼設計沒有辦法回復, 可以由此處接續下去
步驟九:
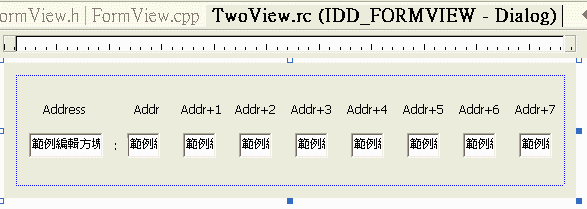
新增一個 MFC 類別 FormView, 繼承 CFormView 類別, 使用對話盒資源 IDD_FORMVIEW
在資源編輯器中編輯 對應的對話盒內容 如下
這個界面主要是讓使用者可以指定某一個檔案中的連續 8 個位元組, 直接檢視其內容, 並且修改其內容, 請替這些欄位 (IDC_ADDR, IDC_BYTE0, ... IDC_BYTE7) 設定 CString 型別的 DDX 變數
步驟十:
由於希望在新增檔案時讓使用者決定需要開啟哪一種 View, 所以我們使用不同的 Document Template:
在 CWinApp::InitInstance() 中加入新的 Document Template 的程式碼
    pDocTemplate = new CMultiDocTemplate(IDR_TwoViewTYPE1,
        RUNTIME_CLASS(CTwoViewDoc),
        RUNTIME_CLASS(CChildFrame), // 自訂 MDI 子框架
        RUNTIME_CLASS(FormView));
    if (!pDocTemplate)
        return FALSE;
    AddDocTemplate(pDocTemplate);
指定新的資源 ID IDR_TwoViewTYPE1, 可以在使用這個新的 document template 開啟 document-frame-view 時使用指定的選單和圖示, 所以同時需要在資源編輯器中加入新的 Icon 以及 Menu, 可以由舊的 IDR_TwoViewTYPE 拷貝後再修改
加入新的選單項目 視窗/開新 HexView 視窗, ID_HEXVIEW
在資源編輯器中新增 DocString IDR_TwoViewTYPE1 (拷貝原來的 DocString IDR_TwoViewTYPE)
\nFormView\nForm View\n\n\nTwoView.Document\nTwoView.Document其中包括七個以 \n 分隔的字串, 意義如下:
       windowTitle\n
       docName\n
       fileNewName\n
       Files (*.abc)\n
       .abc\n
       regFileTypeId.Document\n
       regFileTypeName.Document
我們修改的是 docName 以及 fileNewName, 其中 fileNewName 的字串就是在新開檔案時選單中所看到的文字, docName 則是我們在程式裡判斷是否 為指定的 document template 時使用到相對應於我們在 FormView 的界面中以 視窗/開新 HexView 視窗 選單來打開一個 HexView 視窗, 我們在 HexView 的界面中也需要可以使用 視窗/開新 FormView 視窗 選單來打開一個 FormView 視窗
所以在資源編輯器中修改 IDR_TwoViewTYPE 的選單
加入新的選單項目 視窗/新開 FormView 視窗, ID_FORMVIEW
步驟十一:
在 CMainFrame 類別中處理上述兩個選單項目 ID_HEXVIEW 以及 ID_FORMVIEW, 透過適當的 document template 物件開啟對應的 view, 請注意新的 view 物件還是對應到相同的 document 物件
void CMainFrame::OnHexView()
{
    CMDIChildWnd* pActiveChild = MDIGetActive();
    CDocument* pDocument;
    if (pActiveChild == NULL ||
        (pDocument = pActiveChild->GetActiveDocument()) == NULL)
    {
        TRACE(traceAppMsg, 0, "Warning: No active document for WindowNew command.\n");
        AfxMessageBox(AFX_IDP_COMMAND_FAILURE);
        return;     // command failed
    }

    POSITION pos = AfxGetApp()->GetFirstDocTemplatePosition();
    CDocTemplate *pTemplate;
    CString buf;
    while (pos != NULL)
    {
        pTemplate = AfxGetApp()->GetNextDocTemplate(pos);
        pTemplate->GetDocString(buf, CDocTemplate::docName);
        if (buf == "HexView")
        {
            ASSERT_VALID(pTemplate);
            CFrameWnd* pFrame = pTemplate->CreateNewFrame(pDocument, 0);
            if (pFrame == NULL)
            {
                TRACE(traceAppMsg, 0, "Warning: failed to create new frame.\n");
                return;     // command failed
            }
            pTemplate->InitialUpdateFrame(pFrame, pDocument);
        }
    }
}
步驟十二:
OnInitialUpdate() 由 document 物件內讀取檔案內指定位址 m_addr ... m_addr+7 的資料內容到對應的變數中 m_byte0, ... m_byte7
如果操作者修改位址欄位, 利用 DDX 由欄位中讀入修改過後的位址, 立即由 document 物件中讀取對應資料顯示在界面中 (Hint: 在對話盒編輯棄中以右鍵點選編輯欄位, 加入事件處理常式, 在 FormView 類別中處理 EN_CHANGE notification 訊息)
如果操作者修改任一資料欄位, 利用 DDX 由欄位中讀入修改過後的內容, 立即修改 document 物件中對應的位元組, 設定 document 物件為 modified, 並且呼叫 UpdateAllViews() 更新所有顯示此檔案的 view (包括 formview 與 hexview), 此時各個 view 物件的 OnUpdate() 函式會被呼叫到, 需要在 HexView::OnUpdate() 裡面加上 Invalidate() 來重新繪製視窗內容, 至於 FormView::OnUpdate() 的內容稍為複雜, 需要重新由 document 裡讀取修改過的資料來顯示在各個欄位中
覆寫 document 類別的 OnSaveDocument(), 將 CMemFile 中已經修改的資料存檔 (程式碼在步驟八中)
編譯, 執行, 偵錯, 測試後包裝為 winrar 的 package, 以免將來做錯什麼設計沒有辦法回復, 可以由此處接續下去
步驟十三:
替 FormView 增加 tooltip 的功能
編譯, 執行, 偵錯, 測試後包裝為 winrar 的 package, 以免將來做錯什麼設計沒有辦法回復, 可以由此處接續下去
步驟十四:
標題列檔名的處理, 當檔案內容修改過而沒有存檔時, 我們希望在標題列顯示一個 * 符號, 使得使用者可以了解到更改過的文件還沒有儲存到檔案裡, 當使用者存檔或是另存新檔時, 就應該把標題列的 * 號去掉
這些功能可以藉由 CDocument 的 IsModified(), GetTitle() 以及 SetTitle() 函式來完成
步驟十五:
測試, 測試, 測試